|
A Glimpse Into 15 Years of iATN
Welcome to the third quarter edition of the iATN Review. We started iATN in 1995 with 50 members helping each other via plain-text email. Now we're over 70,000 strong, sharing not just textual help, but images, HD video, and more in an interactive network that spans the globe. The vast majority of us are using high-speed connections from home, work, and even while mobile.
We're proud to see fellow iATN members sharing their collective wisdom of nearly two million years with their automotive peers from over 150 countries. The world and iATN have changed dramatically over the past 15 years, and we look forward to the amazing changes the next 15 years will bring. Thanks for being a part of this!
Whether you joined iATN 15 minutes ago or 15 years ago, you can instantly access almost anything that has ever been posted by doing a search of our Knowledge Base. As you may imagine, the amount of information is more than any individual could read in a lifetime. Thanks to members that take the time to rate and recommend messages posted on iATN, we're able to find thousands of contributions we could highlight here from the past 15 years -- this issue contains just a tiny sampling.
In this issue we have several articles highlighting service tips, including: using the Tech2 to successfully diagnose and repair the power sliding doors found in many GM small vans like the Chevrolet Uplander; a few quick tips on servicing MOPAR EVAP systems; aftermarket catalyst identification that should be very helpful to anyone in emissions inspection and repair programs; and how to make the best of inventory management to drive sales and increase profits!
We hope you enjoy this issue, and don't forget, you can always refer to the newsletter index on the website to read past issues of the Review. As always, feel free to forward this issue to any friends and co-workers who may be interested.

Scott Brown
iATN President

Aftermarket Catalyst Terminology
Technical Theory Forum
Mike from California
Given the recent law changes in California and the posts, I thought it might clear up some of the confusion (or at least not add more to it) to explain some of the terms commonly used with aftermarket cats so it makes a bit more sense. There are some that are quasi-legal terms that are used by the cat regulations and then there are many that are marketing/advertising terms used by the cat manufacturers.
'CARB-approved' -- Should mean that the manufacturer has applied for and received and Executive Order (EO) number from CARB certifying that the specific catalyst model has meant the minimum criteria and been approved by CARB. The proof is an EO #. If it has an EO #, it has been approved. If not, it has not.
EO number -- Executive Order number. Just like other aftermarket emission controls that are not identical to the OEM part (replacement parts) such as intake kits, headers, add-on superchargers, etc, if the part has gone through the legal process to be approved for use in Calif, it gets an EO #. There is actually a document on-line for each EO # that describes the part, the testing that was done to confirm it was legal, and in the case of aftermarket catalysts, all the vehicle applications that the specific part is legal for. http://www.arb.ca.gov/msprog/aftermkt/devices/amquery.php [ca.gov]
'EPA-approved'/'Federal-approved' -- A marketing term, not a legal term. It means nothing because EPA does not have an approval process whereby they review and approve catalysts. To be legal for sale Federally, there are rules but it is up to the catalyst manufacturer itself to decide their cats meet the rules and thus, are legal. There is no application submitted to EPA nor does anybody review it or issue an approval or anything like that.
'49-state legal'/ 'OBD II-legal'/'OBD-legal'/'OBD-compatible' -- More marketing terms. Again, outside of California, it is up to the catalyst manufacturer itself to decide if its own cats meet the Federal rules or not. The Federal requirements are quite simple--the catalyst must last for 25,000 miles and have at least 70% conversion efficiency for HC and CO and 30% (yes that's not a typo) for NOx. Lastly, the catalyst manufacturer must agree to warranty the catalyst for 25,000 miles including if the OBD system detects a bad catalyst in those 25,000 miles. These terms just mean the catalyst manufacter has decided on its own that its cats meet those requirements. It does not mean the catalyst will have high enough conversion efficiency to pass your state's IM tailpipe test (if you have one) or that it will keep the MIL off for a little while or a long while or that it really 'works' with the OBD system.
'50-state legal' -- Another marketing term. CARB approves cats for use in Calif, the manufacturers self-decide for cats in other states. Clearly, if the cat does not have a CARB EO #, it cannot be 50-state legal since it won't be legal in Calif. A CARB EO # doesn't directly make a cat legal in other states but since it is solely up to the manufacturer to decide what is legal in the other states, they typically would decide that any cat that got a CARB EO # has to be good enough for other states. (And yes, that is a very reasonable assumption).
"Direct-Fit" -- A marketing term. Nothing in any regulation talks about direct fit or not. Typically, catalyst manufacturers use this to mean it is a bolt-up type part, not a cut and weld-in type part. It relates only to how the part is installed and doesn't mean a thing about its performance. It does not mean it is 'like the OEM' for catalyst performance or that it has been certified or verified by anybody.
"Universal" -- Another marketing term. The counterpart to 'direct-fit', universal typically means it is a cut and weld-in type part and only refers to the method of installation. Again, it does not mean anything about its performance (or lack of) nor about its legal uses (e.g., it doesn't mean it is legal to put on lots of different vehicles or anything like that).
I won't summarize the new rules again--there have been other posts on that. This link on our website does indeed have some other info if you are interested in the California changes: http://www.arb.ca.gov/msprog/aftermktcat/aftermktcat.htm [ca.gov]
It has the label decoding that Chris already linked, some FAQs that we try to keep expanding, some installer tips, etc. for California-installers and shops.
The bottom line--when Randy or others ask about a Calif cat, they mean one with an EO and no matter what the sales guy on the phone tells you, if it ain't got an EO, it is not a CARB-approved cat that has gone through an approval process. If you hear direct-fit, think bolt-in installation but don't assume anything about how well the cat performs. If you hear universal, think weld-in but again don't assume anything about how well it performs or what cars it is legal on.
And, while the coverage is still not great, for those vehicles that do indeed have a CARB-approved cat legal for it, our testing has shown pretty good durability and conversion efficiency that makes me comfortable recommending them to consumers or installers as a reasonable alternative to OEM.
G6 Electric Power Steering Column
Technical Tips Forum
Robert from Florida
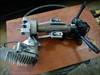
I thought some might be interested in seeing the electric power steering column from a G6. This was an 05 and his complaint was "jerky steering at times". He also had a Power Steering warning message. Tech 2 yielded a C0545 symptom 00 for torque sensor out-of-range. It's looking for no more than 4.75V or no less than .25V on a 5 volt reference. Turning the wheel slowly did show scan readings as low as .1V and as high as 4.9V, the torque and steering position sensors are builtin to the column. It was quite reasonable, 300 beans list price. Job went very easily, disconnect and pull the old column.
old column fully dressed
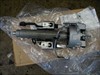
Swap switch, motor/module assembly to the new column.
new bare column
Reinstall, run a quick setup with the Tech 2, you're done. One more thing, these steering wheels have slots for a puller, but every one I have done just pulls off with slight pressure. Nice.
Increasing Sales and Profits Through Efficiency
Shop Management Forum
George from Nebraska
The average tech in the average Indie shop is only actively working on cars about half the time they're available for work. This is not their fault, but is the reason that the people in our trade generally earn less than other trades.
In order to reduce the time techs are NOT working on cars, we have to evaluate everything they do that DOESN'T produce revenue. Some of the more common things techs do that should be reduced or eliminated are: making phone calls to order parts. This should never happen and if it's part of your business plan, you need a new plan. Techs in general should be able to produce $2 a minute in parts and labor sales. A tech on the phone for just 5 minutes just cost you 10 bucks.
A tech looking for a tool for 5 minutes just cost you another 10 bucks.
A tech waiting 20 minutes for the parts store to deliver brake pads just cost you 40 bucks. Holy cr*p, that's more than your net bottom line profit on that job!!
So, let's look at a very simple thing we all have--inventory. Even those who claim to have no inventory, actually have inventory. No one here should be ordering 5 quarts of oil and a filter for an oil change every time you do an oil change. Each of us probably has an assortment of air filters and wiper blades, too.
So, we all have inventory.
My inventory is extensive given the size of my shop and you'll all say, "well, that's easy for you, because you only work on a few makes of cars".
This is a true statement, but just because you work on a lot of different stuff still doesn't mean you can't capitalize on the real value of inventory--less time your techs spend waiting for parts.
So, let's start by running a report in your management system listing the parts you sell ranked by the quantity of each you sell. The stuff you sell the most of will be at the top (well, duh).
Whether you stock any of these parts or not can be determined by a number of factors. First, is it a part that holds up production until the tech gets it? This would be the number one reason to stock it. Remember the 2 bucks a minute concept. Remember you already sell a bunch of them, based on your own reports.
You never need to stock clutches if they're readily available locally, because it will generally be hours from the time the tech starts the job until he actually needs the clutch, for example. Brake pads are different, as they're generally needed within minutes of the sale.
The next reason is to make more money because you can buy them at a much better price out of town. You can't hold a car over every time you need the part, so you buy it locally and spend more than you should to get it.
A radiator might be a good example. If you pay $150 for one locally and can buy them out of town for $90, you make an extra $60 every time you sell one "off the shelf".
The next question to ask is, "is the part coming or going?". What? The "life cycle" of a part starts when new cars are built. You don't need a radiator for a 2-year old car, as it may be 6 years or more before you get a chance to sell one. So, the sales curve on any part starts with when it's first needed on a car, peaks when "they all need that" and slowly declines as those cars are converted into scrap and shipped to Korea, where they come back as a Hyundai, or a Kia.
If the part is on the upswing, stocking it is easy, if it's about done selling, don't even think about it.
Finally, accept that fact that some inventory just won't ever sell and you'll end up writing it off and tossing it into the dumpster. This thought is what most shop owners constantly live in fear of doing, without realizing all the wasted profit that went down the drain while his techs DIDN'T produce 2 bucks a minute waiting on the part to be delivered. Or, worse yet, there aren't any in town and the car has to be put back together and pushed outside.
So, start with the stuff you're selling now and evaluate each part. How many do you sell in the average month, how long does it take you to get it and could you get a better deal if you stocked it.
I think you'll find there are a lot of opportunities out there to make more money without getting more cars in the door or selling more to each customer.
Northstar Timing Chain Tip
Technical Tips Forum
Juan from California
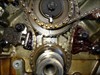
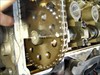
With 4 cams, 3 chains & 6 sprockets, these Northstars can be a bit tricky to set up. One tooth off on any of the camshafts & you will know right away on startup... usually you will get misfires on the WHOLE bank. Easiest way to tell with the misfire graph on the Tech2.
The cam sprockets come marked LE - left exhaust, LI - left intake, RI - right intake, & RE - right exhaust. The RE has the dowel pin for the camshaft sensor trigger & must be positioned with the RE mark up!!! The LE & LI sprockets are the same & can be flipped around to fit the position you need. The RI sprocket has both the RI & RE marks on it, but (believe it or not) can only be fitted on the right intake cam!!!
Now to line these things up when setting up your chains. The intermediate sprocket & crankshaft sprockets should be lined up like this: [1996 Cadillac Eldorado, Engine/Propulsion Photo]
All the cam dowel pins should point 90 degrees from the top edge of the head. We use a piece of plexi-glass with a straight edge to check the camshaft positions. Makes it a lot easier to see if everything is straight... especially if you have to reset the camshafts in the car.
The best position to check your marks is straight in front of the camshaft you are checking.
Here is an pic. [1996 Cadillac Eldorado, Engine/Propulsion Photo]
Here's a top view, just as if it was in the car (there is very little space when the engine is in the car). [1996 Cadillac Eldorado, Engine/Propulsion Photo] The white marks are for your benefit.
An another pic [1996 Cadillac Eldorado, Engine/Propulsion Photo]
2005-2007 Uplander, SV6, Relay, Terraza PSD
Technical Tips Forum
Matthew from Wyoming
I ran into this the other day and thought it would be helpful.
I had an 05 Chevy Uplander van with dual Power Sliding Doors (PSD). The complaint I will deal with here is "When closing the Passenger side door, the motor labors for a while then pops back out."
A quick check of both power doors for operation showed that the left side door acted normally, the motor pulling the door closed to just past the fully latched position, then stopping and going back to the proper latch position. The right side door would pull closed, and continue pulling the door inwards for a few seconds past the latch condition, the motor would time-out and the door would pop back out. This is the same thing as a motor-run-on condition.
I checked for DTC's, none were shown, both doors had been learned (according to scan data) and this problem had attempted repairs at another place, including a reflash which addresses a different concern. I took a look at scan data for both doors to see if there was anything in there of value, I did find there was...once I understood exactly what is going on here, I knew how to fix it. The Left Power Sliding Door data "PSD Detent Switch" PID would clearly show two detent switches consistantly during the latching of the door while the right side sometimes would only flicker a second switched position.
Service information in description and operation only mentions the detent switch is used for determining the proper latched position. I deduced, and later confirmed that it needs to see 2 detent switch changes of state to know when to back off and center the latch. The rear of the door has a latch that activates a detent switch just before and just after the latched position. The PSDM looks for the first on state, an off state, then the second on state, then it allows the door to fall back to the off state, that being the proper latched position. The detent switch goes through the plunger contacts at the front of the door, as such there will be some plunger bouncing so the PSDM's filter out some of that and look for clear changes of state.
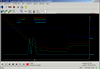
Here are some captures to follow along:
Here is the left side door, which was working properly. [iatn.net] Note it rolls it past the first on state, into the off state, then into the next on state, lets off and the door reverses by turning the motor into the idle state and commanding the motor clutch inactive, letting the door back up into the latch.
here is the right side door before repair. [iatn.net] Note it rolls quickly past the two detent states, the motor continues to run well past the latched position until it gives up then turns the motor to idle and deactivates the motor clutch, allowing the door to pop back out to the latch.
There was a PI for these doors that referred to a know-how video that was broadcast. It covered much of what is already available in service information regarding adjustment procedures and actuator replacements. They also reinforced the importance of making sure the door rolls, opens, and closes as easily as possible. But they also briefly mentioned that if the door closes too easily, then it could cause a run-on condition. This is exactly what was going on with this vehicle. After adjusting the rear striker to achieve proper body fitment and still having the concern, I proceded to pull the door in at the top of the front of the door using the upper roller bracket where it bolts to the door (which is adjustable with those two bolts). [iatn.net] Note, you will need to remove the PSD fuse from the IP fuse panel to do work on these doors. The doors will feel and operate like a normal door with this fuse out and will give you a good idea of how the rolling, opening, and closing feels. I adjusted that upper bracket until I found a good compromise between feel and fit. After the adjustment, I closed the door and reinstalled the PSD fuse. I then used the key fob to open and close both doors twice to relearn the motor positions. Scan data confirms the learn with a switch from a no to a yes. I also noted the problem was now resolved.
Here is the capture I took from the RPSDM after the repair. [iatn.net]. Note the door is slowed down in the latching portion, this is due to increased contact with the door seals. This allows the PSDM to properly recognize the detent switches, allowing it to make the proper determination of the latched position.
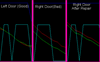
Here is a side-by-side-by-side of the portions of interest in the three captures. [iatn.net] These are exactly the same amount of time side by side by side. You can clearly see the difference in the three situations.
Chrysler P0441 Evap Purge Performance
Technical Tips Forum
Thomas from New York
This particular code is becoming more and more common, and most diagnostic trouble trees will send you chasing a ghost in or around the purge solenoid and plumbing.
Current models using NVLD (Natural Vacuum Leak Detection) as opposed to the earlier LDP (leak Detection Pump) use NGC controllers that use purge as a means of fuel trim and the NVLD switch as a means to signal purge flow, so a P0441 often results when the actual issue is a sticking switch inside the NVLD.
These type problems are often highly intermittent, so the NVLD system will test fine when forcing the monitor or testing the switch for pulling a vacuum on the system manually. You might also see general evap failure codes (P0440) for this same reason and continue testing for leaks to find no issues.
While restricted lines could also result in this code, the NVLD issues are much more common. A handheld vacuum pump at the filter end of an NVLD on a sealed system should trip the switch at a level of 1" Hg.
| |