|
Tap Into iATN
Scott Brown
The iATN Review newsletter is all about tapping into iATN, and once again it contains some excellent discussions rated highly among the membership: Toyota Prius-code P3009, Power Stroke Driveability issue, Difficulty with GM Module Programming, a look at a Venture camshaft issue and much more. With 500+ messages a day posted in the forums, and 70+ TechHelp requests, you may have missed some of these, so dig in!
In the spirit of tapping into iATN, we have created the first of what will be many new videos on iATN, to guide you through the site, and show off features you probably didn't even know existed. This will be a great way for both new and old members to discover (or re-discover) what is available inside iATN.
The first video is a simple overview of the members-only area designed for new members and those who have yet to explore the entire site. As we move forward, we plan to develop in-depth tutorials for all the major areas of iATN, including tips and tricks, advanced features, and more.
These videos will be linked throughout the site (look for the video icon), and the video index can be found here:
http://members.iatn.net/video/
This is our first run at it, so feel free to provide comments and suggestions for future videos to support@iatn.net.
Enjoy!

Scott Brown
iATN President

Electrifying Prius - P3009 HV Leak
Technical Discussion Forum
Harvey from British Columbia
This vehicle is not fixed but has been diagnosed. I'm not looking for answers as to the cause of the failure but more interested in what the logical approach to find the cause of the failure would be.
I was called in to to help with this one, it is not at my shop. Originally, the car came in with a P3009 code. During the course of the diagnostic, it became a no-start. That is when I became involved with it.
Note: They did indicate that the auxillary (12 volt) battery was disconnected during the course of the P3009 diag.
What I first did was a Health Check.
Next, I pull all the DTC's from the modules and their respective Freeze Frames.
HV ECU DTC
HV ECU Freeze Frame 1
HV ECU Freeze Frame 2
HV Battery ECU DTC
HV Battery ECU Freeze Frame
Engine ECU DTC
Engine ECU Freeze Frame
The P3009 code indicates that there is a insulation leak in the HV circuitry. Unfortunately, it doesn't narrow down the area of concern, it could be in the HV battery, the inverter, the frame wires, or in the transmission. In order to test for the P3009, it would involve HV leak testing with a megger, but that means each of the components would have to be isolated from each other. This could be very time consuming.
Techs in dealerships and in areas where there are a larger number of Gen I Prius'es have probably dealt with this code and failure a number of times now. It seems to be a pretty common failure and I'm sure some have struggled with it, while others probably have a good system in place for chasing the failures down. I've not seen discussed in these forums before so I thought it would be a good time as any. :-)
How should we approach this vehicle to confirm an exsistence of a HV leak and narrow it down to a certain area so we don't have to blanket test?
Is the no-start related in some way to the HV leak?
Does the P3009 Freeze Frame help in any way, to determine the area of concern?
What other data that I haven't provided, do you think would be useful?
Thanks in advance,
Harvey.
6.0 Intermittent No-Start with Misfire
HD/Fleet Forum
Fred from Arizona
The suspect truck is a 2004 F450SD 6.0(P) with 213,458 miles on the clock. This truck was brought into us with an intermittent crank and no-start. A scan for codes revealed P0281-60 (Cyl #7 contribution/balance) and P2614 (CAM sensor output circuit open). We were unable to perform a power balance test with PDS. When the engine was turned off, it would not restart until the batteries were charged with the battery charger on high. We performed battery test and both batteries failed the test. The batteries were replaced and the engine would start normally but still had the misfire. DTC P2614 had not returned since the batteries were replaced. We test-drove the vehicle and the engine never stalled. However, the misfire was still present. We also noted that the tachometer needle in the instrument cluster would jump erratically while idling. This was not as noticeable while driving.
This morning the vehicle cranks and does not start at all. DTC's P0281 (Cyl #7 contribution) and P0278 (Cyl #6 contribution) are present. Scan data reveals that SYNC indicates "NO" and FICMSYNC indicates "NO". Yesterday when the engine started and idled, SYNC indicated "NO" and FICMSYNC "Yes".
Here are scan data parameters during cranking no start:
| BARO | 154.67 Hz | EOT | 100.4 deg F |
| BARO | 14.05 psi | VPWR | 10.50v |
| CAM_F | NO Fault | VREF | 5v |
| FICMSYNC | NO | MAP | 14.01 PSI |
| IAT2_F | NO Fault | MFDES | 34.68 mg |
| IAT_F | NO Fault | MAF | 6 g/s |
| SYNC | NO | LOAD | 99.6% |
| RPM | 135 | IPR | 33% |
| APP | 0% | ICP | 888 PSI/1.17volts |
| APP1 | 4.06v | INJ_TIMING | 6.29 deg |
| APP2 | 1.34v | FUEL PW | 0 sec |
| EBP | 0.92v | IAT 1/2 | 98.6 deg F |
| EBP_A | 14.93 PSI | FICM_LPWR | 10v |
| EBP_DSD | 3.91 PSI | FICM_MPWER | 48V |
| ECT | 100.4 deg F | FICM_VPWR | 10v |
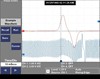
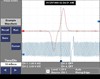
We used a digital oscilloscope to test the CKP and CMP sensor signal at the PCM [2004 Ford F450 Super Duty, ECM/Inputs/Outputs waveform]. Notice how the CKP trends with the CMP. Could this be related to our SYNC code? What could cause this? We were fortunate to have a 2003 6.0(P) in yesterday and captured a wave of the CKP and CMP [2003 Ford Pickup F250 Super Duty, ECM/Inputs/Outputs waveform]. We also captured a wave of the CKPO and CMPO digital signals from the PCM to the FICM while cranking [2004 Ford F450 Super Duty, ECM/Inputs/Outputs waveform]. According to the information we have here, when the CKP sensor signal is present to the PCM then SYNC should display "YES". Do you have any ideas?
Thank you for reading,
GM Programming
Technical Tips Forum
Zach from Washington
Recently when attempting to reprogram a pcm on a 2004 Chevy C1500 4.3l AT. I found that during the programing process the status bar in TIS2WEB would only reach 5-10% programed before it would go back to 0%. After 3 returns to 0% the failed programing screen would appear. Now I realized that I had erased the programing and the vehicle would no longer communicate let alone start or run. I got nervous. I attempted to program the pcm as a new unit but with the same failure. Then I realized that this vehicle had an aftermarket radio, given my previos V.W. expierence I chose to remove the radio, it was then that I found a device that is designed to identify itself as the factory radio and chime and which is directly tied to the CAN bus. I unplugged this device and the programing went without further issues. I contacted the engineering department of this product and was not well recieved. They said that they will follow up with me for further info but have not as of yet. I have chosen not to name this company as I do not know the forum policy but will gladly answer any questions. Hope this will save somebody else the 2 hours I spent sweating over it.
01 Chevrolet Venture 3.4L Cyl #1 Low Compression
GM Engine Techhelp
Larry from Indiana
I hope someone has seen this before! its got us stumped! thanks in advance! This is my first post in years, maybe we have been lucky. This vehicle came in with the typical intake leaking coolant, due to the low miles, we did the intake, of course it pumped compression into the cooling system and we got approval for head gaskets. We found a slight crack in #1 cyl head between intake valve and spark plug hole. Purchased a reman head from Oreillys and have miss in cyl. 1. no compression. got second head,same problem. pushrods are correct,long on exhaust, short on intakes. backed of intake rocker 3/4 turn, get 180 lbs compression. sent head to machine shop, had valve lengths checked thinking the intake valve had been faced too deep, making valve stem too long. all checked out ok. Reinstalled head, same situation, as a test we shimmed the rocker a little at a time and ended up with .070, seventy thousands shim to get proper valve action. replaced lifter,swapped rocker arms, checked and swapped pushrods with good cyls. what are we missing? cam lobes from what we can see look ok, no excessive scuffing etc. The other two cyls on that head are fine. the van ran on all cyls when it arrived! we are truly stumped! Thanks, Larry
Well the bad news is, Kennith king was right! Thanks Ken,and all who replied...
(You can view the full article, 21 replies and FIX here.)
01 Caravan PCM Follies
Technical Tips Forum
Mohammad from Illinois
I had this 2001 Chrysler Voyager (!) minivan which belonged to a non-revenue customer ...(Read: My daughter's car!), after I got the usual call all fathers are familiar with ..."Dad ...my car...(fill in the blank), I am going to bring it over to the shop". Which meant not only I had to fix it for free and pay for the needed parts; I had to provide a spare vehicle so she could commute to work and also get her 7-years old daughter to school and back, for as long as it takes!
Checking the system showed a P0204, which meant cylinder #4 was misfiring (Injector circuit open), MIL on, and the usual shake of a dead hole. Noid light did not show any pulses, injector was accessible and an ohm check showed 12.2 ohms right on the money ...+B to injector was present, and driver wire to the PCM's pin 16 was not open. The engine was of course a 3.0L.
Code cleared, and as soon as the engine started, it popped right back on ...P0204. So the conclusion by what was obvious indicated a bad PCM ...right ...?!!
A rebuilt (used!) PCM from an aftermarket source was purchased, and was programmed by the seller according to the VIN I had submitted. It arrived, was installed, the van started ...and bingo ...a miss, and P0204 ...again! This time the noid light stayed on ...and unburned gas was almost pouring out of the tail pipe. Coincidence ...?!!
Did the same checks as before, PCM connector was disconnected and the continuity of the driver wire was checked again and made sure it is not open or grounded. Was it possible the new PCM was bad also and had the same problem? Could this be a pattern failure?! PCM was returned and another one was on the way. (Week 2)
Enter PCM #2 ...!!! Same M.O., same code, and the same misfire! Noid light on all the time ...engine missing and running rich, gas (almost) pouring out of the tail pipe! Question: What the heck is going on?
Enter PCM #3 from another supplier ...!!! But hold on ...I am not going to make the same mistake again ...or am I ...?!
Is it possible the injector #4 is getting shorted after a few quirts? So ...this time we pulled the whole wiper cowl assembly for access. We pulled the top of the intake out, removed the injectors. All six read 12.3 ohms give or take 0.1 or so. Hard decision, but I stopped myself calling Linder for 6 new injectors!
We also cut the injector driver's wire a few inches away from the PCM just to isolate the system ...(of course it was soldered later on and connected). Meanwhile I used a test light, coming from the battery's +B , and went to the driver's wire at the injector connector, reached behind a few bracket, lines, tubes and such, grabbed the injector harness's multi-connector (close to the exhaust manifold flange!...hint ...hint ...), and started pulling, pushing, yanking and twisting it like a mad man. Lo and behold, at one instance, my test light did come ON ...!!! With a little more effort, I could just wiggle it in a certain way and get the test light to come on consistently. Wow ...is this sucker going to ground intermittently?!
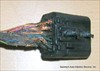
Pulled the harness out [Injector harness], and it looked sorry. Unraveled the tape from the connector (or what was left of the tape) [Injector harness connector] and then saw what was causing the injector driver to go kaput! [Damaged injector wires].
New harness could be ordered by the dealer at $260.00 ...!!! So ...my meticulous tech (Bob C) who is a genius for repairing burned and distorted connectors using any leftover crap, did a fine job repairing it professionally using wires from a discarded Hoppy trailer hitch connector that had come off a Dodge truck, saved for a day that was not supposed to come ...! [Repaired harness connector]
How this van was ever running with all of those burnt insulation and those wires touching each other was an open a question I never found the answer ...but I did not care any more!
The third PCM went on ...the injector driver wire to the PCM was reconnected but we used a noid light in place of injector this time. Started the vehicle which run with a miss, but the noid light was also flashing properly and was not dead (like the original PCM) or staying on all the time (like PCM's 1 and 2).
Crossing my fingers, we connected the injector #4's connector back in ...it run much smoother than I expected and no miss. Cleared the codes again ...and this baby was done.
Of course I did not make a claim on the PCM's (was not their fault) ...so it cost me the price of 2 PCMs and hours of labor, headache, phone calls and frustration.
Guessing I am not the only poor sap who saw such problem on this ubiquitous van ...I hope my case helps someone if you see unexpected PCM and injector problems down the road on similar type of van and engine.
And I was rewarded "Thanks Dad ...by the way, it needs an oil change too ..." ...!!!
In my choices between punching someone or having a decent drink ...I opted for the latter!
Isn't fatherhood grand?
Stubborn Suspension Bolts & Ball Joints
Technical Tips Forum
Rusty from Massachusetts
Suspension bolts such as spring shackle bolts and bolts that pass through a sleeved bushing commonly rust into place in our part of the country. Many times we have to resort to chopping them off and pressing them outta the bushing once the spring or control arm is removed. In some cases an air impact tool strategically held against the end of the bolt (perhaps with a nut partially threaded on) may get a stubborn bolt to move but usually mushrooms the end and makes a mess of the bolt's threads.
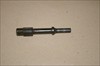
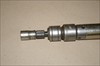
We've used a [Snap-On PH 1050 driver] successfully for a while to loosen bolts. It does a nice job of rattling the fastener loose while you rotate the driver's hex portion with a wrench. The same driver can be used with a flange-nut to rattle out a stuck bolt. I collect castle nuts, flange-nuts,&axle shaft nuts in a plastic jug and find they come in handy quite often. Place a flange-nut on the stubborn bolt or ball joint stud so that the bolt or stud is flush with the top of the nut and so there's a gap between the bottom of the nut and the surface of the control arm or shackle. [Driving out a stuck bolt ] Place a 6-point socket over the nut, and snap the driver and impact gun onto it. It'll usually rattle right out. [socket, driver,&impact tool] Also works slick as turtle-poo on ball joint studs where you have a straight shot at the nut to pop the tapered stud loose from a control arm or spindle.
Avoiding the WWYD
Shop Management Forum
George from Nebraska
There have been far too many WWYD posts here recently and very few serious management issues discussed. Many have lamented how some of the old regular participants in this forum have departed and no longer post.
Let's start over with some good management training.
Step one in avoiding the WWYD post is to do a better job at evaluating what work you take in and what you don't.
Your first measurement is "how many cars do I have around here with an outstanding bill that haven't been picked up?"
If this is somewhat of a problem for you, you have several serious issues with your shop operation.
First, people with pieces of crap are attracted to your shop.
The fix is several things--
First, practice the Soap, Paint and Lights thing. Clean the place up, toss out all the old parts, sell any old equipment you no longer use. Scrub that floor so it looks like you could eat off it.
Paint the walls and ceiling white. Put in brilliant lighting. This will make your techs more efficient, because now they can see (wow).
Paint any old equipment, including hoists, so it looks like it just came out of the box yesterday. We paint our hoist arms every year.
This will repel those who have junk and need a freebie or a "favor". It's amazing how clean repels scum.
It's equally amazing how clean and bright attracts good potential customers.
Don't park any cars in front that aren't nice. Some of the best marketing is a bunch of nice cars out front. Like tends to attract like--people driving by with nice cars will want to visit your shop.
Finally, make sure that you're very clear with every customer "what exactly you're going to do and what it will cost". When I sell testing and inspection, I'm very clear that this is a 2-step process. The first step is to determine what repairs are needed and that has a price to it. After I've given my recommendations, they can either elect to have me fix it or they can take it wherever they want. They just pay the inspection bill and it's 2 separate transactions. One to inspect and the second to fix.
This is where most WWYD posts start, with a lack of clear agreement.
When the car is sitting outside, steaming, with coolant running towards the curb, the shop is in a clear position of strength. Once the car is fixed, the car owner has better control. They can screw you because the car is fixed.
Be sure you have complete agreement on the repair order as to what will happen and what it will cost.
Finally, make sure all repair estimates are what it takes to do it right, regardless what that costs. It costs what it costs and cutting steps that affect the quality of the job is very risky for you.
Any "do me a favor", "I'm just about to trade it" or "this is all I've got, what can you do?" jobs will all come back to bite you.
Remember, if it costs 3 bucks for a burger and all you have is a buck, you're not eating today. Why should car repair be any different?
90% of a repair shops problems are CREATED at the front counter. This business is hard enough without being your own worst enemy and intentionally taking in trouble.
Think before you act, plan ahead and work for continuous improvement.
| |