|
We have two exciting announcements to make for the start of the second quarter of 2015!
We recently launched a new service called iATN® Auto Pro Careers, which allows industry professionals to create profiles and search for new jobs, while also giving employers the opportunity to post open positions and search for qualified candidates. Those that create a candidate profile or post a job can also receive notifications when nearby jobs or job seekers are activated. The new service is integrated within iATN to provide additional value and discovery not available on typical "job boards."
We are also pleased to announce that members now have seamless access to iATN resources from Identifix® Direct-Hit™, via the "quick hits" section that appears when researching a vehicle on Direct-Hit. Links in their new "iATN" tab will bring members directly into iATN, with the current vehicle that was built in Direct-Hit, making it easy to continue researching an issue on iATN. Please read this for more, including information about $10/mo off your Direct-Hit subscription, and a free two week test drive of iATN premium features, courtesy of Identifix.
In this edition of the iATN Review we cover some excellent topics: shorted class 2 network buses, Mazda 6 timing and related codes, GM TIS2Web, Nissan NATS I-Key, differentials & noises, intermittent battery drain, used BCMs in GM products and more.
We hope that you find this edition helpful and informative.

Scott Brown
iATN President

Class 2 Data Bus Shorted
Technical Tips Forum
Morgan from Minnesota
This system, and possibly the issues, are likely old news to many of you, but it was my first time getting a broken data bus on a GM. After many classes and forum posts, I was quite excited to dig into it.
The customer complaint was that the dash was inoperative and there were numerous warning lights illuminated. A code scan on a Snap On Modis Ultra and the Tech 2 network test would not communicate with any module.
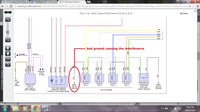
A DLC schematic 2006 Chevrolet Silverado 1500 LS, ECM/Inputs/Outputs Schematic shows me that it's a simple, low speed Class 2 data bus.
I plugged in a DLC break out box and scoped pin 2 with KOEO. 2006 Chevrolet Silverado 1500 LS, ECM/Inputs/Outputs Waveform I know that I should be seeing 7 volts and at least some activity, but this was flat lined at nearly 5 volts.
Luckily GM was nice enough to install a splice pack to make our lives easier on these 2006 Chevrolet Silverado 1500 LS, ECM/Inputs/Outputs Photo Removing the shorting bar I can easily check each circuit. 2006 Chevrolet Silverado 1500 LS, ECM/Inputs/Outputs Photo
I cross referenced the wire colors of SP205 with a schematic, and jumped pin D, which goes to the DLC, to the other wires. 2006 Chevrolet Silverado 1500 LS, ECM/Inputs/Outputs Schematic
I got some activity when jumping pin D to pin M (BCM) 2006 Chevrolet Silverado 1500 LS, ECM/Inputs/Outputs Waveform The other pins stayed at 0V, except for pin K.
Pin K jumped up to a steady 11V 2006 Chevrolet Silverado 1500 LS, ECM/Inputs/Outputs Waveform indicating to me that this baby is shorted to power.
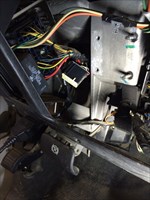
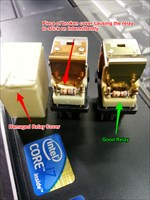
Looking back at the diagram, on the top right, it shows three possible modules with three wires terminating at pin K of SP205. Luckily I only had one Orange/ Black wire at Pin K. This lead me to the Generator Battery Control Module. 2006 Chevrolet Silverado 1500 LS, BATT/Charging/Starting Photo Unplugging the module did not change the voltage at the DLC. The Orange/ Black wire at module also showed the same 11V.
Time to find C100 located between the module and DLC 2006 Chevrolet Silverado 1500 LS, ECM/Inputs/Outputs Photo Conveniently, it's right next to where I already am, underneath the Underhood Fuse box 2006 Chevrolet Silverado 1500 LS, ECM/Inputs/Outputs Photo
With the large fuse box covers removed, you can easily flip the fuse box up and peek underneath. 2006 Chevrolet Silverado 1500 LS, ECM/Inputs/Outputs Photo The first photo is a little hard to tell, but there was some very shiny copper smiling at me under there. Here's a closer look with the connector unplugged. 2006 Chevrolet Silverado 1500 LS, ECM/Inputs/Outputs Photo 2006 Chevrolet Silverado 1500 LS, ECM/Inputs/Outputs Photo
The Orange/ Black wire has the insulation chewed off and is shorting out next to the Green/ White wire next to it.
Wham, Bam, thank you rodents. I repaired the wiring and all of my modules were happy and talking. 2006 Chevrolet Silverado 1500 LS, ECM/Inputs/Outputs Waveform Coincidentally, I had a Suburban in a few months back with a whole bunch of wires chewed up in the same area. I guess the rodents like that fuse box.
I had so much fun doing this that I just had to document my process to share with my iATN people. Hopefully this might help someone down the line someday.
Mazda Timing and Cam Related Codes
Technical Tips Forum
Mike from Ohio
The above vehicle came from a quick lube shop. The oil filter housing cracked and it leaked out 3 quarts of oil. After it was fixed it had a terrible surge and a P0340 code. The code can be deceiving as with many manufactures its more of a correlation code in this case.
I looked at the waveform and cleared the code only to have symptom and code quickly return.
ECM/Inputs/Outputs Waveform
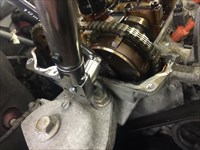
I found a known good waveform and knew what the next step was. To do this job properly you are removing the front cover. Or you can make this hack tool and whip in about an hour.
You take this SK 6 point wrench part # 88365 and have it milled to 3.7 mm and weld a nut to it that allows you to attach a socket.
Wrench milled
There is a tool that screws in the back of the block for TDC that I have but the axle will have to come out. I usually use a vacuum gauge and a screw driver to find TDC #1. I will then steal a bolt form the timing cover and screw in through the balancer and into the cover like so.
Mazda TDC with bolt stolen from cover
With piston on TDC and the valve cover removed you can see the intake cam off.
Cam off
You loosen the Intake cam bolt with special wrench and the exhaust with a crows-foot wrench. You then use a wrench , sorry don't remember the size 1 1/8 inch maybe and rotate the cam until the flat stock bar lines up the cam slots in the back of the cam.
Here is the intake cam sprocket being torqued to spec , actually a few ft lbs more due to the leverage of the butchered wrench =)
Photo
Here is the exhaust cam sprocket being torqued with the crows foot wrench.
Crowsfoot
When that is done the vehicle is started , surge is gone, code is gone, and the waveform looks good.
ECM/Inputs/Outputs Waveform
Not to derail this too much but a very similar thing can easily be done when someone does a front seal and gets timing off by rotating cams to allow the crank to be moved. That is a whole other story.
I know this isn't the right way to do this but it does work and has a place in your arsenal. This case the oil change place tried to bail , the car was rough, customer was pissed , and in 1 hour its business as usually.
To date I have done 4 of these with one being on the road 22k miles and its still fine.
They say the chain stretches when run low on oil I believe the cam gets tight in the head and moves. I'm probably wrong as usual all I know is this keeps the vehicle, customer, and mostly me happy =)
PS this tool only works on the 2 wire cam and crank sensors. The 3 wire hall effect sensors have an 18mm bolt and I have yet to make that tool.
GM TIS2Web and SI User Guides Updated for Aftermarket Users
Tool & Equipment Forum
Michael from Alabama
Aftermarket-centric user guides, relevant links, and tutorials for all GM scan tool, service information, and service programming hardware and software are in one place online:
https://service.gm.com/userguides/index.pdf [gm.com]
Direct Injection Fix
Technical Tips Forum
Daniel from Tennessee
2010 Buick La Crosse CXS 3.6 L with direct fuel injection system.
Vehicle came into shop with complaint of hard start, runs poorly, runs rich and may pop back into intake on acceleration. Vehicle will go into reduced power mode. Repair history in the past 6 months is New -- High pressure fuel pump, 2 fuel lines, pressure sensor, bank1 sensor 2 oxygen sensor, #1 injector.
Codes retrieved were P2178 fuel trim rich at cruise or acceleration bank 1 P2180 fuel trim rich at cruise or acceleration bank 2 P0089 fuel pressure regulator performance P0300 P0301 P0302 P0303 P0304 P0305 P0306 P2189 fuel trim lean at idle bank 2
Vehicle was very hard to start. It would crank up run a few seconds and die like very low of gasoline. Cleared codes and most codes would return. Also P0088 fuel pressure high and P0089 fuel pressure regulator performance along with miss-fire codes. This Fuel rail pressure sensor reading has been jumping around a lot when running, for example at idle it might go from 1 Mpa to 6 Mpa. Each Mpa is equal to 145 PSI. With key on engine off the Mpa measurement would stay steady for example 4 Mpa.The Tech 2 will not communicate with this model. Call ACDelco and they confirmed that it will not. Our Autel will though. The Autel has the ability to control the pressure regulator which is part of the high pressure fuel pump. As we control the pressure up we should see a corresponding increase in Mpa in the fuel rail pressure sensor. The pressure sensor did increase and the high pressure pump (driven by the camshaft) would start singing going up to 17 Mpa. It sounds like it is stressed, as it ought to be. We searched iATN, Google, talked to dealership and came up with nothing. Tried wiggle wires to the system injectors, pump and sensor with no change. The injectors and pressure sensor are under the intake. Pondered new injectors, ECM, wiring, another pressure sensor?
Removed the intake and checked connection to pressure sensor, looked fine. Turn key on (will set codes because of removed intake, throttle, tps etc) watched readings on fuel rail pressure sensor and noticed they did change when wiggling connector. Tugged on the 3 wires a little and Boop the white wire came loose. Replaced the connector with part # ACD- [2010 Buick LaCrosse CXS, ECM/Inputs/Outputs Photo] PT2798 (did not show under application we only found it by the pigtail chart matching up). The pressure sensor part # is 12621292.
Problem is FIXED
I believe this problem will occur on other direct fuel injection vehicles because of the location of the sensor and connector near the top of the heat of the engine.
2015 Colorado Failure
Technical Discussion Forum
James from Florida
Today, I was assigned a 2015 Colorado 2.5 auto that just came from PDI. It had a complaint of MIL on and stalling. Only 9 miles were on the odometer. Taking a fast scan with GDS, I saw this...
Codes Scanned
What's in common with these codes? The 47UA fuse in the UBEC powers up all these components. Checking the fuse, it was blown. I replaced the fuse with a Fuse Buddy and turned the key on. The fuse did not blow and the current draw was 1.9 amps. The codes all cleared and did not reset immediately. I started the truck and the fuse blew after 5 seconds running. Putting another fuse in the Fuse Buddy, with KOEO, it did not blow and the draw was 1.9 amps again.
I replaced the fuse with a tail light bulb wired to two correct sized terminals. With KOEO, the bulb did not illuminate. Starting the truck, after 2 seconds, the bulb lit dimly then slowly brightened until after 5 or 6 seconds, it lit brightly. I revved the engine a few times and shifted from drive to reverse several times and was able to change the brightness of the bulb and make it go on or off at times.
Sounds like a harness ground out, doesn't it? With the bulb fully lit and the engine idling, I carefully moved and shook the engine wiring harness. At the left front corner, near the O2 break out, I was able to turn the light on and off with minor movements. Looking closely, a harness standoff had not been installed at the factory and the engine harness was sitting on top of the rotating power steering pulley and the end rib in the pulley had cut through the harness. Cutting open the harness and repairing the power feed wire from the F47UA fuse repaired the problem.
Nissan NATS, I-Key and Push Start button
Technical Tips Forum
Cesar from Texas
I recently was working on a 2010 Nissan Maxima which Push start button is standard equipment, however I only can start the car with the Key into the slot, and was not starting or turning switch on with just key inside of the car, but I-key was able to lock / unlock doors on the little switch, and also all of the FOB functions was working properly, I was not having any codes and reprogram key many times with same result, after running circles I found that I key start function and I key lock / unlock can be turning on and off on BCM Work Support menu, after turning I-key option on, Push start did work again with just key on my pocket.
This may be known for someone but I look everywhere and didn't find anything until I read on Identifix OE manuals, and hope to help someone down the road.
2014 Silverado Puzzler
Technical Discussion Forum
James from Florida
Here's an interesting case. A 2014 Silverado came in today with an interesting problem. It has a 4.3 engine with 14,000 miles. The complaint was service charging system and low battery message coming on in the DIC. I drove it in the shop and the low battery message was on. The truck cranked and started normally. The gauge on the dash read about 14.5 volts running.
i tested the battery with the GR-8 and it passed. The battery voltage with key off was 12.68 volts - fully charged. Running, the voltage was at 13.9 volts. I scanned for codes and found this....
2014 Chevrolet Silverado 1500 LT, BATT/Charging/Starting Scan Data
Interesting..... Next I looked at EPM data in the BCM and saw this
2014 Chevrolet Silverado 1500 LT, BATT/Charging/Starting Scan Data
The code would not clear with the engine running. With key on, engine off, it would clear for about 5 seconds and reset as current. Everything else worked normally on this vehicle and there were no aftermarket add-on devices. This vehicle is repaired but I had to spend more than G.M.'s .3 diagnostic time on it. how would you diagnose this problem?
Differentials & Noises
Technical Tips Forum
Scott from California
A few months back, Arthur M. put up a post about 2003 Chevrolet Avalanche [iatn.net] that was run low on gear oil, and now has a "gear noise". From his initial post --
"If anyone has had this type of problem please let me know on all types of fixes short of replacing ring & pinion gears. Note: All the bearings are OK & have not been damaged in any way by the low oil condition."
I'm not sure why this post struck a chord with me, but it did. Actually I do know why…The only posts deemed helpful by Arthur, had nothing to do with addressing the source of the noise, but had to do with 'fixing' this with inexpensive techniques. I can't comment on using Crest to quiet down a noisy gear set, but I can say this will not address the root cause of his rear differential noise, and that if it did work, it was a temporary measure.
I've done some differentials since that post, but this one I'm currently working on is a good example of what may have happened on Arthur's Avalanche.
A customer brings in his 2008 Silverado. It's a half ton with a 8.6 rear differential. It has a little over 170,000 miles on it. He requested a rear end service. I asked if it was maintenance, or was there a problem that needed to be looked at. No problems…OK
I road tested the vehicle. I noticed a noise when turning left that went away when turning the right. This wasn't heard going straight. On a coast/deceleration there was gear noise heard from the Ring & Pinion gears that went away accelerating. I call the customer up…Yeah, it's been doing that for about a year. Um…OK
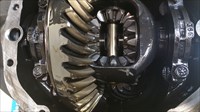
No leaks were seen and the differential was filled. I removed the inspection cover.
This is what I saw. [2008 Chevrolet Silverado 1500 LS, Photo] Looks good, right? That is until I looked a little closer. [2008 Chevrolet Silverado 1500 LS, Photo] And here [2008 Chevrolet Silverado 1500 LS, Photo]
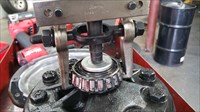
Tip - Removing pinion yoke [2008 Chevrolet Silverado 1500 LS, Photo] Taking this apart I see the following - [2008 Chevrolet Silverado 1500 LS, Photo] [2008 Chevrolet Silverado 1500 LS, Photo]
Another tip I'd like to point out after doing rear ends for a few years is the complaint of noise if reusing the gears. I've had a few differentials that had bearing noise, but when I was done there was a problem setting them up. What did I do? I thought I didn't change the set-up? Or did I?...
Pay attention when removing the old races. Clean up the area(s) with a burr or dremel tool.[2008 Chevrolet Silverado 1500 LS, Photo]
Same on the case after removing the side bearings. [2008 Chevrolet Silverado 1500 LS, Photo]
Tool tip - Case spreader. I had one on this truck, but it was not needed as the case came out of the housing easily. Putting this back together it will definitely be of help.
Differential Set-Up Tips For the 8.6 rear end - GM PIP3720D
Finally, going back to a rear end that was quiet from day 1 until now. I stand by my statements to Arthur, something changed to cause the noise. I'm not sure why we want to be hero's when we should be fixing things and making money, but...
Intermittent Battery Drain
Technical Tips Forum
Robert from Massachusetts
I had an interesting failure on this Mercury Sable. The customer said that every few days her battery would be dead. I did the usual starting and charging system tests and checked for drains. After a half hour or so everything would power down and the drain was under 20ma.
I could not duplicate the problem. The second time I saw the car the customer asked if it could be an issue with her remote start system. It was an aftermarket system that was not working properly. We took a shot and disconnected it. Unfortunately about 6 days later I got the call again. Battery was totally dead. She had it jump started and drove it in.
This time I got lucky. I pulled the car in and left it running to check the charging system. I noticed right away that the A/C pipes were all frosted up. That seemed a little strange since it was only about 15 degrees out. I went inside the car to turn off the hvac and I saw that the switch was already in the off position. I rotated the switch back and forth and the compressor continued to run.
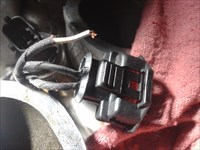
Finally, some much needed clues that helped to locate the intermittent drain. The problem was a damaged A/C compressor clutch relay. The cover was cracked like something heavy was dropped on it. When the cover cracked a small piece broke loose and was jamming the relay contacts. The relay power feed is hot all the time so when it jammed, the A/C clutch would stay energized even with the key off. This would obviously drain the battery pretty quickly. A new relay and all is well.
A/C clutch relay
Used BCM in G.M. Products
Technical Discussion Forum
James from Florida
Stay away from used BCM's in G.M. vehicles. You may get away with it for a while on older vehicles but there will always be one that bites you hard.
Today, a 2005 Colorado came in from a Toyota dealer. It is one of their used cars. It originally had 104,000 miles until they touched it. From what I was told, it had some type of lighting concern and one of their techs diagnosed it as a bad BCM. Naturally, they purchased a used BCM. When the BCM was plugged in and the vehicle driven, the speedometer reading changed to 220,000 miles and the SES light came on. The radio also locked up and stopped operating.
After is was shut down, it would not restart at all. They towed it to a nearby shop who installed, programmed and set up a new OEM BCM. The speedometer stayed at 220,000 miles. The truck runs now, but the SES stays on and the radio is still inop.
They towed it to us next. I hope that they're ready to spend some money...... :)
08 Buick Enclave CXL 3.6L Engine Low / No Compression
GM Engine TechHelp
Dale from North Dakota
Hello Members. I towed this one in off the road as a "Stalled, cranks, but won't restart". When I tried to start it on the road it didn't sound right when it cranked, almost like the cams were out of time. We got it in the shop, recharged the battery, checked codes: P0011, P0014, P0021 were back, and decided to test compression. Front bank was 30, 60, 90 psi. Rear bank: 0, 45, and 60. Uh oh.
Started looking over the rest of the engine and discovered that the oil hadn't been changed [by us] for about 11,000 miles. Drained the oil and got out about a quart of black stuff that might have been oil once. Refilled with clean oil and attempted to start engine again but after a short bit of cranking it was evident that nothing was improving. If you look just right in the oil filler hole you can see the front cam turning but obviously something bad has happened.
Can the timing chains on this motor jump somehow? I suspect that even though the low oil pressure light didn't come on that it was starved for lubrication and something finally had to give. I strongly suspect that this motor is done for but any ideas or thoughts you might offer would be greatly appreciated!
Interference in Throttle Body TPS
Technical Tips Forum
Vincent from Quebec
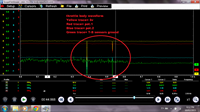
I got a very weird problem with this one, first up it came in for misfire and lack of power problems and it end up with a no start condition. I replaced one ignition coil and reconnect an intake duct. Then the car runs well but still has no power. Soon after it started stalling and running rough. 2B0B Throttle valve potentiometer and 2B06 throttle valve potentiometer 2 came out. I scoped the 2 signals and power/grounds of throttle body. At first it looks to me like a DME(control module) power feed or ground intermittent problem. I then realize that the spikes were occurring only when the engine was running. In fact, the spikes were noise. I then scoped the ground of the secondary coils circuit and I saw immediately the problem.
bad ground location Interference caused by a bad secondary ignition coils ground. [wave form of the interference]
| |