|
Searching iATN
Hello everyone,
As we round out the year, we've got another edition of the iATN Review packed full of great messages posted on iATN last quarter.
We just recently released a new premium membership level, called Business+, which offers an easy, cost-effective way to give your employees individual access to premium iATN features, like search. You can read more about it here.
And now we're excited to announce that we have been working on a completely new search engine for iATN, and we're close to starting a beta program for those that are interested in helping us test it out.
This new search engine will address a lot of the annoyances currently found in our existing search engines, the biggest of which will be that it centralizes the searching of all of the resources on iATN in one single place.
During the beta program which is scheduled to begin soon, we will be working closely with participating members to iron out any bugs and accept new feature requests for consideration.
Join our search engine beta program here.
We think the new search engine will change what you've come to expect from searching automotive information, and we can't wait to release it to you early next year.
Happy Holidays,

Scott Brown
iATN President

Head Gasket Check / TDC Location
Technical Tips Forum
Mike from Ohio
I helped a buddy who was struggling with a Cadillac for days with a running hot issue. I also used this a day later with our other shop and a very random P0300, P0301, P0302, P0303 code on a Honda.
The head gasket issue seems to be a thorn in the side of many people and has burned me in the past several times. It may be as subtle as intermittent misfire or as serious as a split radiator tank. You may even get a vehicle with an air pocket in the cooling system that once you fix may run at a good temperature for days and then show up again. The point I'm trying to make here is when faced with these type of complaints investigate some before you do say a radiator, a tune up, a water pump, or the famous a thermostat!
You may say what about the blue block test? It's the ohm meter of tests IMO if it tests bad its probably bad, if it tests good it still may be bad.
Now air in the cylinder is the best way and is nothing new to most guys. The problem is the pressure and finding TDC with most engines. The Cadillac I literally did in 20 minutes at 5:30 last Friday and ruined someone's weekend but sold no more parts or wasted no more time. Granted I used misfire history to find # 3 had 25 counts to help speed this up.
I use a Vacuum gauge slid on the compression hose with the Schrader removed. If you slowly rotate the engine by hand you will easily see the compression stroke over 10 PSI and the point past TDC start pulling vacuum. The nice thing is you can go back and forth as many times as needed to find that 0 psi sweet spot, remember backwards mean backwards readings. When I get there sometimes I take a long screwdriver with a dab of paint and make my own reference mark on the crank pulley. You can also use it for the companion cylinder if needed to speed things up on that cylinder. Mainly I use it so when slowly adding air If the engine starts to rotate clockwise I know I need to slightly turn the engine past my mark counter clockwise and visa versa.
I use straight shop air with an adapter which is 135 PSI at our place. Once its on TDC its not moving unless bumped. PS: take socket and ratchet off crank =). I crimp the overflow hose and fill the bottle or tank about 1/8 below. If you have a cracked tank it can be tough but its probably going to be obvious.
This Cadillac raised the level to overflowing in about 30 seconds so be patient and leave it on there if needed. One more PS do not put your face near the fill hole at first , you maybe be surprised and soaked at the same time if bad enough. & nbsp;
While most of this is not new to many people I continue to see parts thrown at vehicles when maybe this test could be sold first in some cases...
Click here to read the rest of this article and ensuing discussion.
Toyota Tacoma Wheel Hub Removal and Installation
Technical Tips Forum
Ken from Maine
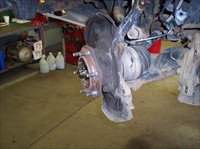
This is an alternate way to remove the hub from the wheel bearing. It allows the job to be done with the shop press instead of putting the entire spindle in a vice and using a puller set-up to pull the hub out of the bearing.
This is the hub and bearing attached to the spindle-brakes removed:
[2006 Toyota Tacoma, Photo]
At this point, I remove the axle nut and the 4 bolts, and remove the hub just like any other FWD hub assy., except that the bolts will be captured. They are too long to be removed, and there is no opening in the hub to remove them. I do this with the spindle still on the vehicle so it will be held securely. You will end up with this:
[2006 Toyota Tacoma, Photo]
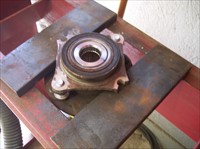
It would be easy to press this apart like any other hub,but the bolts are captured,and a press plate that will hold up to this job is just too thick. The first time I did this, I was stuck here for about 20 minutes, tried making some thinner press plates (they bent), and just wished those bolts weren't in the way. Then I realized I could cut 2 of them off, press the hub out, and replace the 2 bolts...... but I didn't have any that size. Then it dawned on me-the housing comes with the bearing-I can cut the housing out of the way to free the bolts. Five minutes with a whizz-wheel, and I had this:
[2006 Toyota Tacoma, Photo]
Now it fit in the press:
[2006 Toyota Tacoma, Photo]
With the old bearing half removed from the hub and a new outer seal installed, it reassembles just like any other hub-just don't forget to put the bolts back in the hub first!
[2006 Toyota Tacoma, Photo]
The video shows the method of pulling the hub out with a puller. Not having a hub grappler or a coworker to smack it with, the method above works great for me. Being able to use the press to push the hub out reduces the chanced of damaging it, and pressing it nice and straight seems to make it go very easy. I think the hub grappler method only makes the hubs feel like they are seized because they don't always pull straight.
http://youtube.com/watch?v=ZDd-34K5Epc [youtube.com]
Transmission Codes - Simple Tool and Procedure
Technical Tips Forum
David from Missouri
Hi All, Many aftermarket technicians such as myself are faced daily with the problem of the service information for certain vehicles that say you must use a "Breakout Box" or some other type of "special equipment" to properly diagnose a particular electrical circuit.
Most aftermarket technicians know EXACTLY what I am talking about when I say that you must "read between the lines" and figure out exactly what is being tested and why. Then you have to come up with an alternative method of performing the same test, in a different way, so you can get your customer back on the road.
My first purpose in this post is to share with you a "special tool" that is easy and cheap to make yourself and can save loads of diagnostic time. My second purpose is to show you a practical application (case study) of this "special tool" to show you some of its potential.
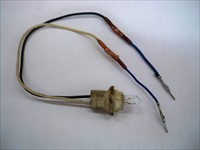
I'll start with showing you the tool [Handy Electrical diagnostic tool]. Not impressed? Let me tell you what it can do:
Have you ever tried to use a conventional test light to test for power and ground at a solenoid connector? At best, it is very cumbersome and hard to get a good connection.
The "test light" in the picture is fitted with flat GM weather-pack connector pins. This is my favorite one because it will fit many GM, Ford and asian connectors. However, I have about seven of these currently in my toolbox that are fitted with different pins (some male and some female) to fit different applications. I use them for everything from testing EVAP solenoid circuits at the solenoid connector, to window motor circuits.
The test light fitted in this manner doubles as a "drag test" tool to check for loose fitting connector pins (another reason I have several of them).
Now for the case study:
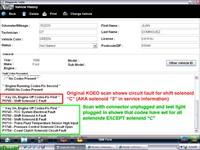
The Ford Explorer in this example came in with the check engine light on and a KOEO fault code of P0760, for which my Snap-On Verus rendered a description of "Shift Solenoid C Fault". (See area in picture marked in RED.) [1996 Ford Explorer XL, Engine/Propulsion Scan Data]
Reading through the service information, I found that it was one of those where the manufacturer's instructions were telling me to use a breakout box and a special adapter to fit the transmission connector. Then they gave a nice little diagram to show the correlation between the breakout box pins and the transmission vehicle harness connector pins. [1996 Ford Explorer XL, Transmission Drawing]
I also found that the manufacturer's information referred to the solenoid circuit as "Solenoid 3" instead of "Solenoid C". This may sound trivial to some of the more experienced technicians, but this can be really confusing to an apprentice. Sometimes it takes quite a bit of research just to make sure you are working on the correct circuit.
After reviewing some of the service information, I realized that I first needed to find out if the circuit fault was inside the transmission or if it was a vehicle harness or PCM failure that I was dealing with. I reasoned that the VPWR circuit to the transmission must be working. (Otherwise, there would be codes for ALL of the transmission solenoids, not just the one.)
So, to prove that it was inside the transmission, and to prove that the PCM was not defective, I did that "read between the lines" thing. I decided to disconnect the connector from the transmission and use my "special tool" to complete the circuit between the VREF and the Solenoid 3 circuit. (See areas marked in RED in picture.) [1996 Ford Explorer XL, Transmission Drawing]
I ran the KOEO self test again with the connection made this way, and Voila! The "special tool" illuminated for about 3 seconds during the test. Also, the PCM recognized the circuit through the test lamp and did not reset the code P0760, but it instead set codes for every solenoid in the transmission EXCEPT the "Solenoid C". (See area in picture marked in GREEN.) [Handy Electrical diagnostic tool] So, in one simple test, I verified that the circuit fault was an internal transmission fault. (It turned out to be the solenoid itself.) I also verified that the PCM was functioning properly and reporting circuit failures correctly!
I have found MANY uses for my "special tools". The application in this study is just one example. Hopefully you will be able to discover many others!
Why We Do Voltage Drop Checks
Technical Tips Forum
Andrew from Utah
I've recently heard again from several technicians that they use test lights instead of a voltmeter. I am of the opinion that test lights do have their place and my test light is in a place where I haven't seen it for a few years now. I still have it I'm just not sure where. My DVOM is kept in the bottom drawer of my tool cart where I can grab it quickly and easily because it gets used often.
One of the top tests for charging system analysis is a voltage drop check using a DVOM. It is very effective at finding connection issues that otherwise could not be found with a test light or a resistance check. Most of the time a normally operating system will have very close to a 0 volt drop across terminals. Starting circuits are slightly higher due to the amperage that flows through when the starter is activated. By slightly higher I mean 0.1-0.2 volts.
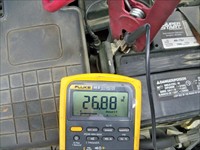
Usually when something is broken it's broke. Drops of several volts on a broken connection are common. Up to battery voltage on a corroded battery terminal is also seen often. What we don't see very often is this: [1995 Mercury Mystique, BATT/Charging/Starting Photo] Yes, the meter is reading correctly. What you are looking at is an open circuit between the alternator output terminal and the battery positive. If the meter was connected between ground and the alternator output it reads over 36 volts!
This car could have easily had an alternator (or three) thrown at it and still have a no charge condition. Do the proper tests before throwing parts. It only takes a few minutes which is far less time than doing a second alternator R & R.
Interlock Fix
Technical Tips Forum
Daniel from Tennessee
Vehicle will not come out of park at times. I have seen where several posts at iATN and other sites where the person never found the problem and so I am posting my fix here.
Some of the suspects involved are the ignition switch, brake switch, meter fuse, Park-No Park switch, Shift-Lock Solenoid, and ground. First tests appear that the shifter shift lock solenoid is bad. We removed the shifter covers and found the solenoid at the bottom and center of the shifter assembly. The shifter releases after using an extension and tapping on the solenoid.
The assembly is over $550. We connected a graphing voltmeter (Vantage) to the 2 wires going to the shift-lock solenoid and found no voltage when the shifter is not releasing. We are loosing voltage and not loosing ground. The voltage gets it's hot from a relay. The SHIFT-LOCK RELAY (remember that name) contact side is dependent on a hot from the Brake Switch and the coil side is dependent on a hot from the 10 amp meter fuse. This relay is in the under dash fuse box-body control module behind the glove box. It costs almost $900.
There are about 8 mini-relays in this module. All are non replaceable and are soldiered into the circuit board. The circuit board is 3 layers thick so the soldier connections are not accessible (easily). Going through he wiring diagrams We tested and found the Blue wire that grounds the coil side of the relay through the park no park switch was working when the problem occurred. So the P-NP switch is OK.
We opened up the BCM and plugged it up without its upper and lower covers off. When moving in and out of park I found the relay that was clicking. When the problem occurs we could tap gently the relay and the interlock would release. We ordered a new relay based off the numbers on the relay and images.
We removed the old relay by force and cutting off the 5 prongs. Then we soldiered 5 short wires on the remaining terminals on the circuit board. Then we soldiered the relay to the 5 corresponding wires and epoxy the relay to the one next to it. The vehicle is fixed. [2004 Mazda 3 i, Photo] [2004 Mazda 3 i, Photo] [2004 Mazda 3 i, Engine/Propulsion Schematic] [2004 Mazda 3 i, Photo] [2004 Mazda 3 i, Photo] [2004 Mazda 3 i, Photo]
Act Like You've Been There Before
Shop Management Forum
Becky from Nebraska
The young athlete scored a touchdown in a collegiate game. He immediately launched a shameless display of self-centered celebration regarding his own success in the end zone, demonstrating a distinct lack of class.
The coach pulled him aside after he'd high-stepped off the field and said, "Act like you've been there before".
The young man lacked the perspective of success and he had been totally immersed in himself. The outcome of every play, when it's drawn up, is to score. If every player does the job they are supposed to do, that's how it happens. It's teamwork.
A "natural, organic" grocery store had spent a lot of money to send out glossy, color mailers, offering a pound of organically grown beef for free with the coupon. This store's market was not the homes in the neighborhood, it was the entire city. I got one of these coupons in the mail and stuck it in my purse. The store was out of my area, but I was very curious about the beef and had been intending to try some. I finally got to the store, took the beef to the checkout and discovered that my coupon had expired literally 2 days before. It was the first thing the clerk pointed out---"This is expired!" she sternly proclaimed.
I don't wish to get into the free stuff discussion or even the discounting discussion. The issue is, the store spent money, she ticked off a customer because of poor perspective--either hers, the store's or lack of training in how to handle the recently expired coupons situation. (Hint: never spend money to make a customer mad--you can make them mad for free).
How many times do we see posts here lamenting the lack of respect we get from the public? Do we act like we deserve it? Do we maintain the perspective to understand how each of our own actions weaves the fabric of respect and success, both for us and our employers?
How can a supervisor of workers disrespect a worker through words or actions and possibly expect respect in return? How can a team member expect to be respected themselves if they don't follow simple rules of teamwork?
It is amazing to me to read thoughts expressed here about how being and acting like "being the all-important center of the universe" is all that should be expected of any of us. If we simply do our jobs, that should be enough. Never mind that we don't respect others, they should still respect us.
If any of us expect this trade of ours to earn respect in our communities, we must start by acting like we've been there before and are respected every day. Respectful people act like they are not only respected themselves, but they respect others, as well.
One of the true measures of character is how we treat others who can never do a thing for us in return.
Why You Should Have a Dedicated Service Advisor!
Shop Management Forum
Michael from Georgia
After several post about using a Tech as a Service Advisor I thought I would share my thoughts. Without derailing the other thread.
Is a tech the best at selling repair work? My answer is most of the time NO! Why you ask? First to give you some back ground I have more time as a Salesman than I do as a tech, so I know sales. I think I am a better salesman than I am a Tech.
Techs are by nature are technically orientated people, in sales too much info is almost always a bad thing, it confuses the customer, most do not care what a MAF does or really why they need one, all they care about is how much and will it fix my issue. Adding to much info just makes the customer question you more and the more you talk the less they listen, in sales after the presentation the first one to talk looses!
Going to a customer with a broke car and telling them it will be $XXXX.xx is never an easy thing, people can smell fear, and most techs are not sales people and lose their confidence real quick when having to ask a lot of money from someone, especially if it will impact their paycheck. You lose your confidence the customer can tell, and will have a larger issue approving the work just because you did not show confidence at close.
If a tech already has a full day scheduled and finds more needed work will he really try to up sell? Will they call to get approval to keep the car another day etc? Or blow it off in their mind thinking they will not buy it anyway so why bother.
Anyone can sell to a customer with a broke car that came in on a hook, they have a broke car and will have to spend more money to get it out of your shop so unless the truly cannot afford the repair 95% of the time they will approve it, but if it is not broke can a tech up sell a timing belt job or some other needed but not required service? Will they sell a repair or service that they hate doing; I doubt it most of the time!
Time, let's say the Tech/SA has work lined up and is trying to sell a job, he has other work he could be doing, but a customer needs some time spent with them aka going over options on what work has to be done and what work can be put off etc. The tech/SA will not spend the needed time to close that sale just because he has work to do, so that customer did not get the need time to close the complete sale yes you may get the current concern, but if they spend some time they could get a lot more of the work, a dedicated SA will spend the time to get the complete sale without worrying about needing to turn wrenches.
Pricing out tickets, most techs are programmed to think about hours billed, you know that whole flat rape deal, not per ticket average parts, margins etc. The higher the ticket goes the less they will think about parts margins, the more the shop looses, the more they want that 10 hour job, the lower the parts prices go so they think they will get those hours. Can a tech be great at sales yes, but I would bet they would be even better as a dedicated SA over being a SA/Tech. Sales is a talent not something you can easily learn, People have to like you and you have to be able to communicate to them the way they want to get the sale.
The best Service Advisors have confidence in what they are selling, never think about if the customer can or will buy, just present what needs to be done ASAP and what should be done and let the customer decide what they can afford and what they want done. Sales are also about comfort, a good salesman can tell how he or she can talk to a customer, and some customers need a little time to think about it others need a nudge to approve the work. Some you have to be blunt to get the sale they could care less about the, who what or how just when will it be done and maybe how much!
A true salesperson will know all this after talking with a customer within a couple of minutes how to sell to them, someone that does it part time or with little to no talent will not and could lose a sale just on the presentation of the RO.
I am sure everyone has heard the expression he or she could sell Ice to an Eskimo or sand to an Arab not very PC but very true of a real Salesperson, we talk a lot about wallet flushes here on iATN, but the fact is you have to be really good to sell those, ethics not required. Think about it you have a customer come in for a LOF and your SA turns around and tries to sell them 500 buck worth of flushes and gets it, do you think someone without talent at sales could do that? But think about this take that same SA and give them the recommendation that that same car needs a Timing belt and water pump do you not think they would have it sold easier than a bunch of wallet flushes?
A dedicated Sales person will sell more and make the shop a lot more money than a tech/SA ever could.
IDM and FICM Breakout Box
HD/Fleet Forum
Matthew from Pennsylvania
I wanted to share this with you guys. I have found and purchased a breakout box for a Ford FICM, VT 365 DT 466. The break out box works on all dlc2 engines and will allow you to plug the harness in from engine and even allow you to plug a test IDM on the truck for a DT 466 application. International does not offer this nor do they know about it. This box it for a Mercury Marine engine for a propulsion control module. Motorola makes the logic for the marine engine and also the Ford and International engines. The pins and plugs are exact and fit perfect. Just wanted to share because we have been using a 12 pin breakout box for years.
This is what International offers. Here's the link https://mercurymarinecds.spx.com/Display.aspx?t=53&p=46 [spx.com]
[idm 5] [idm 4] [idm 3] [idm 2] [idm 1]
2013 Malibu E-Drive SGCM Replacement
Technical Discussion Forum
James from Florida
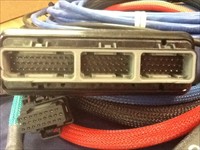
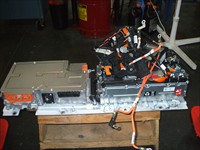
I thought I'd post some pictures to show you what's coming your way in the near future. This is a 2013 Malibu with E-Assist technology. The vehicle came in with a low battery message on the DIC. Checking the 12 volt battery, KOER, 12.4 volts was the maximum reading. Scanning the control module systems, the HPCM set P0AC4-00 and P0CA2-00. The TCM set P0562-00.
The P0562-00 is a low voltage code, the P0AC4-00 is a requested illumination code. The code concerning the failure is the P0CA2-00. This is a 14v. Power Module Step Down Voltage Performance code. The SGCM contains the HPCM, 14 Volt Power Module and the Drive Motor Control Module. It is serviced as an assembly. The 14 Volt Step Down Power Module uses switched MOSFET transistors to convert the 130 Volts from the Hybrid battery to 14 volts to supply the 12 volt system. When the power module sees a MOSFET failure, it will disable the 12 volt system feed and set P0CA2-00.
The Battery module must be removed from the vehicle to replace the SGCM. Here is a picture of the battery module in the vehicle with the high voltage interlock cover removed. If you look carefully, you can see a tie wrap holding the high voltage interlock switch in the off position for my safety.
[Drive Motor Battery Module]
Next, the internal components are visible with the cover removed. Caution is necessary as the module is always "hot" under the cover.
[Battery Module With Cover Removed]
Next, the new SGCM is installed on the left side of the module and is ready to re-assemble.
[SGCM Replaced]
Not that difficult a job to do. Just be careful so you don't end up a crispy critter.
| |