|
Students of the Trade
Scott Brown
Once again, this edition of the iATN Review is packed full of great articles posted throughout the network from the past quarter. We hope you enjoy! But I wanted to take a few seconds to tell you about an important new feature.
When it comes to iATN, most of us come here to learn more about our industry and trade. And I think those working in the trade can agree that we usually learn something new every day, or at least re-learn something we've forgotten. ;-)
For many years now, the number one request from educators has been, how can they get their students access to iATN, so they can benefit from all of the experiences being shared here as well? I am proud to say that we now have a method in place where educators can easily invite their students to join iATN! Although typical students do not meet our minimum membership requirements, we have developed this special program to allow them to join, strictly as observers with "read-only" access.
We feel that this is a great way for upcoming techs to gather some additional perspective while on their journey into the automotive industry. For many, iATN will be a valuable asset, leaving them better prepared for the moment they enter the workforce. And all students are eligible for full membership privileges once they have graduated and obtained an ASE certification or at least 4 years working in the industry.
Educators will find the link for their invite code on the upper right of the index page of the Educators Forum, or directly here. Additionally, educators are encouraged to provide feedback about this feature by replying to this forum post, or privately via email to support@iatn.net.
Regards,

Scott Brown
iATN President

An Interesting Diagnosis
Technical Discussion Forum
James from Florida
This Vehicle is repaired. This is a case history only.
A 2008 Impala was dropped off today. I was given the R.O. which stated "Vehicle will not crank at times. This only occurs when the PRNDL indicator is not operating. If the PRNDL indicator is functional, the vehicle will crank and start every time. The PRNDL never stops operating when the car is running and the car never shuts off by itself."
There was no other information available as this was a used vehicle from a car lot that was dropped off. It was a V6 automatic with no added on modifications.
I went out to the drive to get the car. When I turned the key, the vehicle would not crank. The PRNDL was lit up but the gear position indicator (a circle around the letter) was not lit. I went back into the shop for the tech 2 and ran a fast module scan. There was no communication with the ECM, TCM, BCM or VCIM. Suddenly, the gear position indicator illuminated and the car started. At that point, I had normal communication with all modules.
I drove the car inside and tried starting and restarting several times with no problem. I let it sit for 15 minutes while I finished another vehicle and when I returned and turned the key to the run position, the indicator did not illuminate. Leaving the key in the on position, and doing nothing to the car, after 30 seconds the indicator illuminated by itself and the car started.
Trying it several more times, I found that if I left the key off for 10 minutes or so, when the key was turned to run, the indicator would not illuminate and the car would not crank. If the key was then left in the run position, after 20 seconds to 45 seconds, the indicator would illuminate and the car would start.
I know how I diagnosed it. How would you?
Doing the CAN CAN Again
Technical Discussion Forum
Martin from British Columbia
Hi all. I have followed with interest some of the posts in the last year or so, where CAN based communication case studies have been presented for our interest and discussion. In particular, more recently James Avery posted a High Speed GM LAN issue and as I observed the ensuing thread unfold, it became apparent that there was plenty of interest in this topic.
While CAN systems have been around for a long time, we have seen CAN "C" brought into the forefront since the 2008 MY. What I notice is that the case studies are great, but participation is somewhat limited to a few "die hards" who either understand the system function, failure and diagnostics, or conversely, quite openly admit that they lack knowledge of the CAN systems and yearn for more.
So, the purpose of my post is to contribute some numbers and a few thoughts to the cause. While I no longer actively wrench as a technician, I must also learn each new technology and system as it is introduced, on a wider range of vehicle systems than when I was a technician full-time. Apprenticeship, vehicle manufacturer and dealership needs of the shop and technicians, dictate that we train students in specific areas and network communications is a clearly defined apprenticeship topic in third level.
While my work may not quite assimilate your "real world" experiences, it is my "real world", where not only installed bugs, mishaps, damage and other problems happen to challenge us along the way. During my week, there is some time set aside without students present, for me to attend to "Functions 3 to 8" in our collective agreement. This covers a wide range of program maintenance needs, processing marks, prepping labs and taking care of ensuring that everything is up and running.
This particular Friday began with me scheduling marks processing and prep work, but first I needed to move a few vehicles around for the next series of activities. One car, a 2009 Chevrolet Malibu 2.4L, was sitting in the shop. That needed to go outside, but it didn't crank. The dome lamps and IP were lit with doors open and key on, exterior lamps turned on, but nothing happened when the key was turned to crank. Without getting sidetracked, there were a few other systems that didn't function, such as the electric trunk release, but all that I wanted at this point was to shift the beast outside. I'm on my own, all alone with nobody with me, so pushing is out. Read the entire article here.
Recessed Strut Nuts
Technical Tips Forum
Steven from Washington
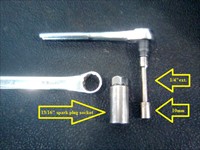
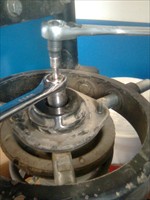
I don't know if others have figured this trick out already. I did a search but didn't see it (I'm sure some have figured this out too).
On some struts, the center nut is recessed down in a hole and you have to figure out a way to hold the strut rod and turn the nut (if your impact doesn't zip it off all the way).
This is on a '02 Dodge Neon, but it will work on others too. The service info does call for a special tool number to do this, but this is how I do it.
The tools you'll need: [strut tools]
The tools set up on the strut: [strut tool]
You can also use your O2 sensor sockets in place of the spark plug socket for nuts that are 22mm or 7/8", and you can use a hex bit in place of the 10mm socket where needed.
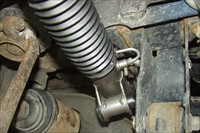
05 Jeep Liberty 4 Wheel Drive Steering Rack
Technical Tips Forum
Eric from Wisconsin
This 4 wheel drive Jeep Liberty came in with a leaking power steering rack. When replacing the steering rack on a 4 wheel drive you are supposed to remove the front differential. I looked it over and decided I would rather not spend 6 hours replacing the rack.
After a brief inspection I thought it would be easier to remove it out the front instead.
I started by disconnecting the sway bar links and removing the sway bar. I removed the front differential mount and oil filter drain gutter. Then I removed the rear differential mounts and lowered the rear of the front differential. Disconnect the power steering lines at the rack. Disconnected the steering column and both tie rod ends. Then I rotated the top of the rack towards the front of the vehicle. Then turn the rack input shaft all the way to the right to shorten the left tie rod as much as possible. This will extend the right inner tie rod as much as possible. Now you can pull the left inner tie rod up and around to clear the left frame rail. Continue rotating the rack around while moving it forward and out.
The new rack gets installed in the reverse of the removal. Slide the new rack in place. Turn it all the way to the right extending the right tie rod out through the right frame rail. This will shorten the left tie rod as much as possible. Move the rack as far to the right as possible. Rotate the input shaft of the steering rack up and around to get it in position. This will allow you to move the left inner tie rod up and around the left frame rail to get it in position just ahead of the front differential pumpkin. Finish the installation by bolting the rack in place, attaching the lines and steering shaft. Raise the rear of the front differential up and install the rear mount bolts. Install the front sway bar and connect the sway bar links. Install and connect the outer tie rods and align the front end. Fill the power steering system and test drive the vehicle.
Total time from start to finish was 2.5 hours including setting the toe and the test drive.
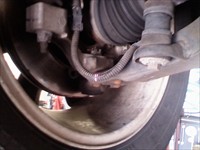
Intermittent Phantom ABS
Technical Tips Forum
Darrell from Tennessee
I've had 10 of these GM platform vehicles in the last 2 months with a complaint of phantom ABS and/or ABS/Traction lights illuminating on turns. Out of the 10, only one (05 LaCross) had a history code of C0240. Some were quick to duplicate and others (like this LaCross) could easily of been NPF's
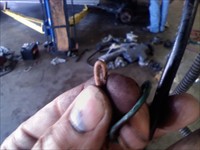
Being they were intermittent and since I've seen this before, I went straight to the wiring harnesses for the front sensors, where they connect with the sensor. This is what I found on all 10 of these vehicles.
First I marked the conduit in the middle of the bend [L/F mark] and this particular L/F is good [Good sheath] as the sheath is still intact. Looking at the R/F I find this [ABS sensor wiring] The broken sheath inside the conduit is a dead giveaway. After removing the sheath I start bending the wire and have found that if it will only bend this far [Bending wire] then that particular part is good. So continuing down the harness I bend here and get this [Broken wire] If it bends together like this, you've found your break. Notice the insulation is intact. On this LaCross both Right side wires were broken [Both broken] Simple wiring repair is all that's needed.
Out of the 10 this is the only one that had both wires broken. 7 had 1 wire broken on the R/F, 1 had 1 broken on the L/F, 1 had wires broken on both sides, and this 1 had em both broke on the R/F.
COP Secondary Leakage Test
Technical Tips Forum
Phil from Oregon
A Ford Truck came in today with a complaint of a misfire. The problem was confirmed during the initial test drive at approximately 45 MPH and above and under moderate load.
No codes were stored (big surprise there), but Mode $06 data revealed misfires mostly on #1 and only a few on #9 (a V10).
Since #1 is so easy to access I removed the coil and plug and found a very worn original plug.
I always check COP coils on the bench and check them with my handy dandy KD 2632 Portable Ignition System for voltage output and leakage.
This is what I found on the #1 coil. [Ignition leakage test] All the other coils were fine. The output was strong but the boot was leaking so I replaced the #1 boot and all the plugs.
Thanks for reading, iATN is awesome!
Ford 6.0L ICP Testing
Technical Tips Forum
Ryan from British Columbia
I was working on a 2007 F-350 6.0L today with an extended crank when hot and low ICP pressure under full load. I performed the regular ICP tests including air pressure test, dead heading the pump, checking engine oil pressure and examining the IPR valve. During my diagnosis I came across another option for testing the ICP system.
I know many shops are now using nitrogen at high pressures (up to 2000psi I've heard) to find leaks in the HP oil system. I do not have this option at this time but I notice if I command the IPR to 85% and then crank the engine with the FICM relay out to prevent it from starting the computer will only allow 44% duty cycle max. This equates to around 1,600psi but when you stop cranking the duty cycle with return to 85% which will not hold the pressure but will maintain over 500 psi for a few minutes.
This test can be performed immediately on a hot engine without any disassemble and may be useful for determining if the system has a leak with high pressure than shop air.
Vortec Fuel Pressure Regulator Job TIP Deluxe
Technical Tips Forum
Dan from Texas
Next time you do a fuel pressure regulator job on a Vortec
Recently I was commissioned to repair a flooding condition on a '96 GMC with 4.3 L Vortec and the notorious "Spider" SCFI unit... I always like to verify the "dribbling" condition of the regulator prior to replacement so I reattached the fuel pipes and jumped the relay, yup, dribbles. Then I noted the "crispy" appearance of the tubes that lead to the "popits" and the melted "rabbit ears" of the poppet retainer clips(gone).
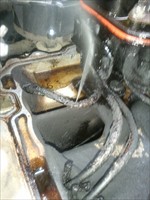
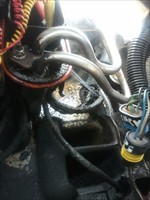
So I went a step further and wired my injector "buzz box" to the pins up top and "fired" several injectors and This [1996 GMC C1500 Sierra SL, Fuel Supply Photo] is what I saw and this [1996 GMC C1500 Sierra SL, Fuel Supply Photo] and this [1996 GMC C1500 Sierra SL, Fuel Supply Photo] and also, this [1996 GMC C1500 Sierra SL, Fuel Supply Photo].
So next time your tech (or YOU) do a FPR job, take the time to VERIFY the integrity of the TUBES, just takes a few minutes. (charge for it, included in estimated time) and it could keep ya from having a COME BACK or if ya have one that "just don't run quite right" & this "internal fire" happened at an undetermined time in this vehicles past and it could have motored right along until the regulators failure (dribbles) made the hard starting flooding occur these "sprays" only would happen ONLY AS the injector was told to "buzz" by FRED (Friggin' Ridiculous Electronic Device) and robbed the poppet of it's ability to deliver but fuel WAS being misted into the airstream so that cylinder WOULD (kinda) get it's intended spritz but then again so would ALL the others PLUS their intended spritz (when it's time was due) this would make them run PIG RICH with no APPARENT reason the fire "could" have been from the dribble. Probably was thing is MORE damage WAS inflicted that might not be detected WITHOUT this "buzzing" of injectors that I did next one YOU do remember this test and DO IT!
05 Chevrolet Silverado 3500 6.6L Cuts out, Stall...
GM Driveability TechHelp
Joe from Ohio
Replaced all these repair history items last year and problem went away for almost a year! Last time code p0642 would store after long runs when towing and very hot (great time for a failure) vehicle would store code and immediately stall. Sometimes would restart, sometimes not.
Had to 4 different Chevrolet Dealers and that is when all the components were replaced. Found 1 of the batteries was totally shot and after replacing that I have had no problems until now.
After truck had sat for a few days, went out to start and idled for about 10 sec and then stumbled and stalled and would not start, towed to shop pulled p0642. Vehicle now starts and runs fine. Prob is intermittent, cannot seem to make it occur again, but I am sure it will when I least want it to...
Has anyone seen similar?
Intermittent's are the WORST to diagnose because the data is not always there.
Here is the fix posted 3 days later:
This was a tough
one... 5V supply feed circuit on connector C7 was damaged due to
resting on metal bracket. It was a VERY tiny pin hole and wire would
only occasionally rest against bracket and short out. This was what
made this problem so difficult to diagnose. (You can read the full article, 6 replies and the FIX here.)
| |