|
Welcome to the iATN Review!
Welcome to the first edition of the iATN Review! With thousands of technical articles, fixes, and new automotive discussions taking place every week on iATN, it can be easy to miss some of the great things being discussed. This newsletter was designed to highlight some of the real gems from the previous few months.
On a quarterly basis, we will highlight a few of these highly recommended articles in the iATN Review. Most of the articles will be from the previous three to four months, but we will throw in an older article from time to time. We hope you find the featured articles from this newsletter worth your time, and if you find other posts, fixes, or images on iATN over the next few months, please be sure to recommend them by pressing the recommend button (thumbs up) located throughout the site.
You can also save your favorite messages to My iATN using the save button located on most messages/files throughout the site. Once saved, you can group these items into a collection of great articles of your own, which you can then share with other members, similar to how we're sharing our favorites with you here. To highlight this, the articles in this newsletter have been grouped together in a collection (located here), if you wish to save it to My iATN.
As always, we hope you enjoy, and we welcome your feedback on this, and any, iATN feature.
Enjoy!

Scott Brown
iATN President

Blown Outside Rearview Mirror Fuse
Technical Tips Forum
Robert from Florida
Truck I had about a month ago, fix might help somebody. This was a new-style Sierra 2WD. Complaint was "power mirrors inop". This truck had base power mirrors, no memory, just the fuse, switch and mirror motors. Schematic is SI doc ID 1848963 Customer had replaced the fuse twice, it now had a 5A fuse and it was blown. Spec is a 2A fuse in the left IP fusebox.
I started by installing a testbulb in place of the fuse and driving the vehicle and operating the mirrors, a short would hopefully light the bulb. No luck. Checked for TSBs and found 08-08-45-002 that talks about 2 concerns. First is harness damage caused by a trimpanel screw, second is possible loose or unplugged connectors at the mirror motors. I bit on the first possibility, and pulled both front doortrims to inspect harnesses. No luck. Then I used my Vantage Pro to current ramp both motors and saw 55-60ma running and 100-105ma with motor stalled, pattern always looked good. So I called Technical Assistance, looking for a silver bullet :) This gentleman was not much help, he thought I should pull both mirror motors and check for loose connections and then replace both motors for possibly being shorted. I explained that I had checked motor draw and it was never more than 105ma and it had blown a 5A fuse, he argued that a motor draws more current with high resistance or a bad ground, yada yada. I wasn't convinced.
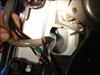
Finally started thinking, decided to inspect the harness where it leaves the fusebox. Had to pull a couple trim pieces and then found the harness cut near the parking brake. Part of the self-adjuster is visible in the picture, a sharp lever that moves with the park brake. Several wires were damaged, almost anything in the Left door could be affected by this. [Fig 1 - Harness Damage]
Talked to customer, he is an elevator repairman and we had a nice conversation. Last 10 years have brought major changes to elevator technology. I was surprised at what they can do now.
2005 Chrysler Pacifica 3.8 P0016, P0300 broken flexplate
Technical Tips Forum
Thomas from Missouri
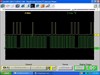
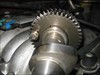
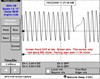
Hi folks the vehicle came in with a cam crank synch code and random misfire code. I know this engine platform has had a issue with the flywheels for some time but when searching the archives I could not find any waveforms for this specific application and I was able to get a few uploaded of before and after the repair with some pics.
Please notice this thing had barely moved the alignment of these signals but was enough for the NGC controller to flag some codes and after measuring 18.0hg at idle of vacuum and the alignment of the signals was enough for me to take a look at the wheel with the trans removed.
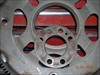
I thought it might be useful to share some of the repair here and suggest if you suspect a cracked or broken flexplate to try and view the inspection area in transmission bell for a rusty powder as a indicator of a broken component this one had a fine collection of dry rusty powder on the flywheel.Also with the wheel still attached to the engine it is very hard to see the broken area as it is covered by a additional bolt plate.
[Fig 1 - Waveform] [Fig 2 - Waveform] [Fig 3 - Cracked Flexplate] [Fig 4 - Cracked Flexplate] [Fig 5 - New Flexplate]
Also keep in mind all of these Ive ever seen or even heard about had absolutely no noise .
I hope this can help someone in the future!
Dodge Caravan Stalls After Hard Accel
Technical Tips Forum
Jeff from Missouri
This 2001 Dodge Caravan 3.3L V6 (VIN 3 Flex Fuel) came in last week from another shop.
The guys at this other shop had just put a new fuel pump in this thing about a week ago and couldn't get the problem to go away. The symptom was that the vehicle would run fine as long as you didn't go into passing gear. If you hit the accelerator hard enough to get it in passing gear, it would slowly stall and not restart until it rested a bit.
I put this thing on the rack, cause I didn't want to get stuck on a test drive... but it wouldn't act up. So I grabbed my cell phone, along with a bunch of tools and drove out of the shop. On my way out the door, I told my boss to get ready with the tow strap. :-)
Sure enough, the van quit less than a mile away from the shop. The fuel pressure gauge showed 0 psi. But, while I was waiting for the boss, I could hear the fuel pump running when I turned the key to on. Also, using propane I could get it to start back up. Obvious fuel supply problem.
We quickly got it back on the rack. I figured I would go ahead and drop the tank and see if I could find a mistake in the install of the fuel pump; maybe something in the tank that would point to the problem. So, I unhooked the fuel supply line at the tank and got soaked with fuel. No big deal. Not the first time I've went home smelling like gasoline. Obviously, I had more than 0 psi at that point in the system.
Next, I hooked up 2 pressure gauges, one at the tank, the other at the schrader valve underhood. I commanded the fuel pump on with the scantool. I had 65 psi at the tank and 0 psi underhood.
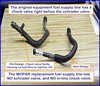
I built a makeshift underhood fuel supply line out of pieces from my fuel pressure gauge adapters, in order to replace the suspect restricted line. I went for another test drive... the vehicle ran great!
The O.E.M. replacement fuel supply line has no schrader valve and no check valve.
[Fig 1 - Fuel Lines]
3.2 Isuzu Timing Belt Nightmare
Technical Tips Forum
Ciro from Texas
Hello, I had a learning experience too good not to share. This involved the timing synchronizing of the above mentioned vehicle. It seems technical information is a little obscure on this application and even following the instructions step by step listed on Isuzu TSB 1B00-S005 it yielded no good results on this one. By the way, I found a short cut related to this procedure and found out that the TSB leaves out a key piece of information. A little more on that later, first off a little background on this particular one:
Vehicle came in a hook from another shop for a "No start" complaint. At the other shop the heads had been removed for a seized camshaft, the timing belt had snapped and the water pump damaged. Both cylinder heads had been sent to a reputable machine shop, the water pump and the timing belt got replaced and there was the "Never runned afterwards".
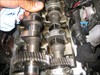
First thing done at the shop was verify complaint. Sure enough, crank wont start, backfire every-now-and-then. Timing synch suspected. Pulled timing cover off and verified every timing mark aligned with their respective marks. Not being familiar with this engine is time to pull tech info. Pulled valve covers to verify proper cam-to-cam synch, is a mess. Nothing lines up. MOD lists the procedure (and the aforementioned TSB), followed it and for some reason the lobes don't point to where the info says they should. Hmmmmmmmm, thinking cap on, realize "some" inaccuracies on ANY information system. Called MOD and had them fax factory information. Same thing. Followed the factory information to the letter to no avail. At this point I start to doubt my reading comprehension ability.........and then a light turns on in my head!
Paying close attention I noticed this: [Fig 1]. The right bank intake camshaft drive gear wasn't flush against the lip on the camshaft. I then compared it to this: [Fig 2]. Hmmmmm. A call to the other shop verified the right intake camshaft was the one that seized. Ok then time to hunt for another camshaft. Once another cam was located, the damage was obvious. This is the good camshaft: [Fig 3] Notice the position of the lobe related to the letter "R". Compared to this: [Fig 4]. You can see the difference on this picture: [Fig 5] Pay close attention to the 5mm locking bolt and use that as reference.
As for the key piece of information missing from ALL sources: The exhaust camshafts are the same for both sides and as a result they have 2 sets of marks: A single dot and a double dot (and they are both stamped RE and LE) The intake camshafts are different and thus labeled LI and RI. Looking real close at the LI (left intake) you'll see it has a double dot and you are supposed to align this to the sub-shaft and use THE DOUBLE DOT from the LE. Funny, Isuzu TSB calls for using the sigle dot. An easy way to remember this is USE ONE DOT ON BANK ONE and TWO DOTS ON BANK TWO.
As for the short cut. The TSB is a 9 page procedure that calls for aligning the dots on the drive gears to the subshaft and turn the cam sprocket up to 9 times on the right side and a few times on the left side until the sprockets spring to the 12'o clock position on the right bank and 9'o clock position on the left bank then turn 90 degrees BEFORE installing the timing belt on. SHORT CUT: Align the dots on the R bank and DONT turn it, then align the dots on the L bank and TURN it 90 degrees, then install your belt. You are done!
Sorry for the long post. Whoever had a hard time with this application knows exactly what I'm saying. And I hope that whoever hasn't had the "joy" of working on one of this finds this post useful.
Nissan Maxima ignition coil low amp probe test
Technical Tips Forum
Bill from Kentucky
I get calls and emails occasionally on this and the main question concerns finding the "loop" to connect the low amp probe to.
[Fig 1] [Fig 2]
The loop shown here is only on the 2000 up, what I used to call the "new body".
There is a loop on the other end (front) of the engine but if you look at the wiring diagram you will see it is only in series with the #1 coil on the B+ side. That would explain why you can only pick up one coil :) This loop is also on some of the "new body" cars. I don't know why it's there but I see little use for it in diagnostics. The loop referenced above, on the other end of the 2000 and newer cars, does not show up in any diagram I've seen but I've never seen it fail to be there.
You can check the older COP cars almost as easy as the newer ones. Every one I've tested have had the ground for all the coils in the same place.
[Fig 3] [Fig 4]
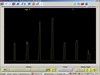
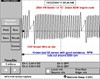
This is on the lower intake, front side of the engine. The car I used for this was a 99 and it is ground F19 on this car. I think it is on the right bolt but looking at my on picture I can't say for sure. It's for sure one of these two and it's always been a solid black wire. Just set your scope up at 10A and 200-250MS and keep clamping around wires until you get the pattern you're looking for, then fine tune from there. Here are a couple of captures from this car.
[Fig 5] [Fig 6]
VW Diesel No Start and Cuts Out at High RPM
Technical Discussion Forum
Scott from Missouri
Do you guys remember this one?
[VW Diesel - Fuel system operation - no start 9-20-08] (Link to previous web forum post)
Well I've got an update, and fix for it. I'll warn you ahead of time. This is a long one. Well here goes:
Subject vehicle: 2004 VW New Beetle 1.9 "C" BEW diesel engine
We do some diagnostic work for a used car lot in town. They asked me to look at this New Beetle with a CHECK ENGINE light on, and we agreed with stipulations. The reason for the stipulations were that we don't normally work on too many foreign cars, and even fewer VW's. So the agreement was to do a baseline check and get back to him. His complaint was an intermittent "cranks but won't start". He stated that if he turned the key on, and the "glow plug light" was flashing, then the car would not start. But if the light came on for a little while then went off, it would start and run perfectly.
Initial testing revealed trouble codes P0727 (engine speed input circuit no signal), P0674 (cylinder #4 glow plug circuit open), P0673 (cylinder #3 glow plug circuit open), and P0672 (cylinder #2 glow plug circuit open). We proceeded to test the glow plugs, and the car had only one good plug. The other 3 had various amount of heater element missing. The customer was informed of the possibilities of additional problems and possible repeat overheating and we replaced the glow plugs. We disregarded the CKP code due to a comment on iATN that any time the engine cranks excessively, that code will set.
After replacing the glow plugs, the car did not start right away, but before we could check anything else, it started and ran and continued to work normally for a couple of days, so he picked up the car only to return a couple of days later with the same complaint. This time the only code stored was the P0727 (engine speed input circuit no signal). We found the glow plugs to be working normally, using and amp probe, so we began to look elsewhere. A simple resistance test of the CKP sensor revealed it to be partially shorted according to manufacturer's specifications, so we waited several days for a new OE sensor. The OE spec is 1k to 1.5k ohms. Our old sensor read about 650 ohms.
We installed the sensor, and the car did not start for several minutes. We spent some time trying to decide what to test next, and a few minutes later the car started normally. It would not act up again for several days, so the customer drove it again, only to return with the same complaint, as well as a new one. Now it also cuts out intermittently above about 3000 rpm. Since it didn't do that before the sensor, and we didn't notice it after the sensor, we thought that maybe we were going to get a break and be able to find something more consistent. At this time, I tried to get my customer to go to the dealer, but he would have none of it and wanted me to try to fix his car. I enlisted the help of the guys on iATN, but apparently this is not a common engine and I could get no concrete answers to my questions. We did get a tip about the electric lift pump located in the fuel tank causing an intermittent no start whenever the pump did not run, so we tested ours only to find that it was dead. We talked to our customer and he said he would only buy it if that would fix his problem. I told him that there was no way I could confirm that it would be all of his problem, but that it was indeed dead. He was afraid of getting in much deeper, since he was way over his head already.
Since I could get no definitive answers from my friend on iATN, I had a heart to heart with the customer again. He agreed to allow me some testing time to try and confirm the lift pump issue. By now, the car was dead and would not start for about a week while we were waiting on him to make up his mind about that $500 pump. (You can read the full article here.)
05 Jeep Grand Cherokee 4.7L Poor Idle Quality, Misfire
Chrysler Driveability
John from New Jersey
This jeep was just brought in to me with a rough idle, MIL light on with misfire codes and a B-1 downstream fuel system lean code. The vehicle will set either a random misfire or cyl 1,3 or 5 at idle only and the p2096 code after a 3 to 5 minute highway cruise after you decel and idle for about a minute. The local dealer had replaced the pcm, cyl heads, all coils and injectors and the "y" pipe with cats! I have done a visual inspection on the wire harness and wiggle tested, swapped the 2 downstream o2 sensors and removed the egr tube from the intake for testing purposes. The rough idle problem acts like a partially open EGR valve but that is not the case. I have smoke tested engine for vacuum leaks, Swapped the coils and injectors from bank 1 to bank 2 and inspected the inside or the fuel rail for any problems. Fuel pressure is a steady 58-60 psi and volume is strong. I drained the fuel tank and replaced with fresh, clean fuel even though it looked fine. Exhaust backpressure is near zero for both banks at 2000 rpm. The last thing for me to do is check cam timing on the left head. Engine running and static compression is all well with-in specs! One thing to add is the freeze frame for the p0300 always shows rpm under 300 when it sets the pending code. This is not the case as it never goes below 600. Any ideas or help would be greatly appreciated!
Thanks for the four replies. The problem ended up being a bad alternator with diodes leaking a/c voltage into the charging system. Once the alternator was disconnected and the PCM got nice "clean" voltage all the problems went away. The local rebuilder that we deal with said it is fairly common on that alternator (Nipondenso 160 amp). Have a great day!
| |